How to Easily Connect Claude Code in IntelliJ IDEA — Complete Step-by-Step Guide (2026)
If you want to connect Claude Code in IntelliJ IDEA, you’re in exactly the right place — this is the single most common thing Java and backend developers search for once they realize Claude AI shouldn’t have to live only in a browser tab. The good news: Anthropic’s official Claude Code plugin lets you use your existing Claude Pro subscription right inside IntelliJ’s terminal — no separate API key required. If you’d like the official reference alongside this walkthrough, Anthropic’s own JetBrains IDE documentation covers the plugin’s supported features in detail.
In this guide, I’ll walk you through the entire process of how to connect Claude Code in IntelliJ from scratch, using real screenshots from my own setup — including the errors I actually ran into (like the classic 'claude' is not recognized message) and exactly how I fixed them. By the end, you’ll have Claude Code fully authenticated and running inside IntelliJ, and if you’re setting up a fresh machine, check out our related post on installing Node.js and npm before you begin (update this link to point to your own related article).
What You’ll Need Before Starting
- IntelliJ IDEA (Community or Ultimate)
- A Claude Pro (or Max/Team/Enterprise) subscription
- Node.js and npm installed on your system
- Windows, macOS, or Linux (this guide uses Windows/PowerShell screenshots, but the steps are nearly identical on Mac/Linux)
Step 1: Purchase or Activate a Claude Pro Plan
Claude Code works with any paid Claude subscription — Pro, Max, Team, or Enterprise. If you don’t already have one:
- Go to claude.ai and sign in (or create an account).
- Click on your profile/settings and select Upgrade plan.
- Choose the Pro plan and complete the checkout process with your payment details.
- Once active, your account is instantly eligible to authenticate with Claude Code — no extra API key purchase needed.
💡 Tip: You do not need to buy separate API credits just to use Claude Code with a Pro plan. The CLI authenticates directly against your subscription.
Step 2: Connect Claude Code in IntelliJ by Installing the Official Plugin
- Open IntelliJ IDEA.
- Go to File → Settings → Plugins → Marketplace.
- Search for “Claude Code” (currently listed as Claude Code [Beta]).
- Click Install, then Restart IDE when prompted.
This plugin is just the interface — it doesn’t include the actual Claude Code engine. That has to be installed separately as a command-line tool, which is where most people (myself included) hit their first snag.
The Error You’ll Likely See First
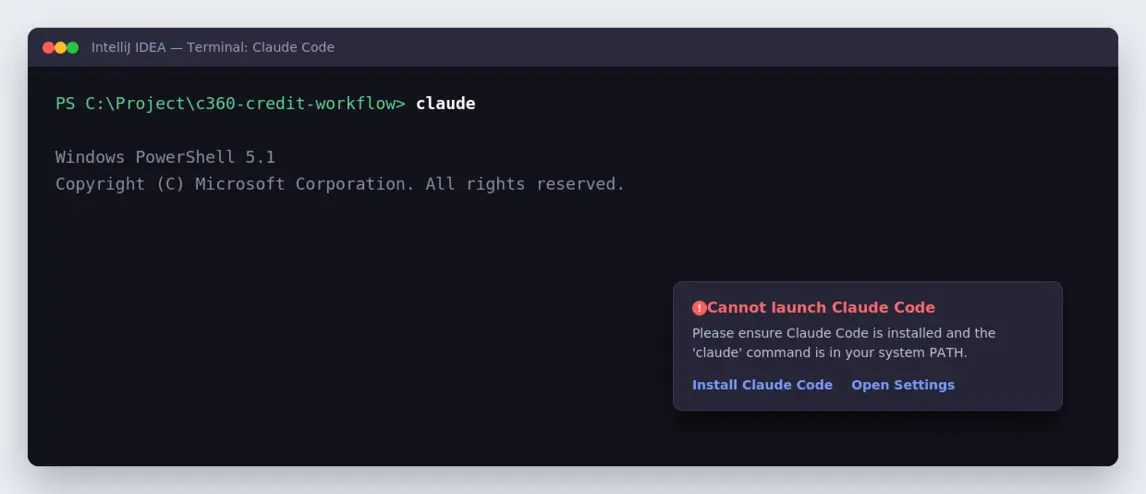
After installing the plugin, if you try to launch Claude Code before installing the CLI, IntelliJ throws this:
“Cannot launch Claude Code — Please ensure Claude Code is installed and the ‘claude’ command is in your system path.”
This is completely normal at this stage. It just means the plugin is installed, but the underlying CLI tool isn’t yet.
Step 3: Install Claude Code CLI (in a Normal Terminal)
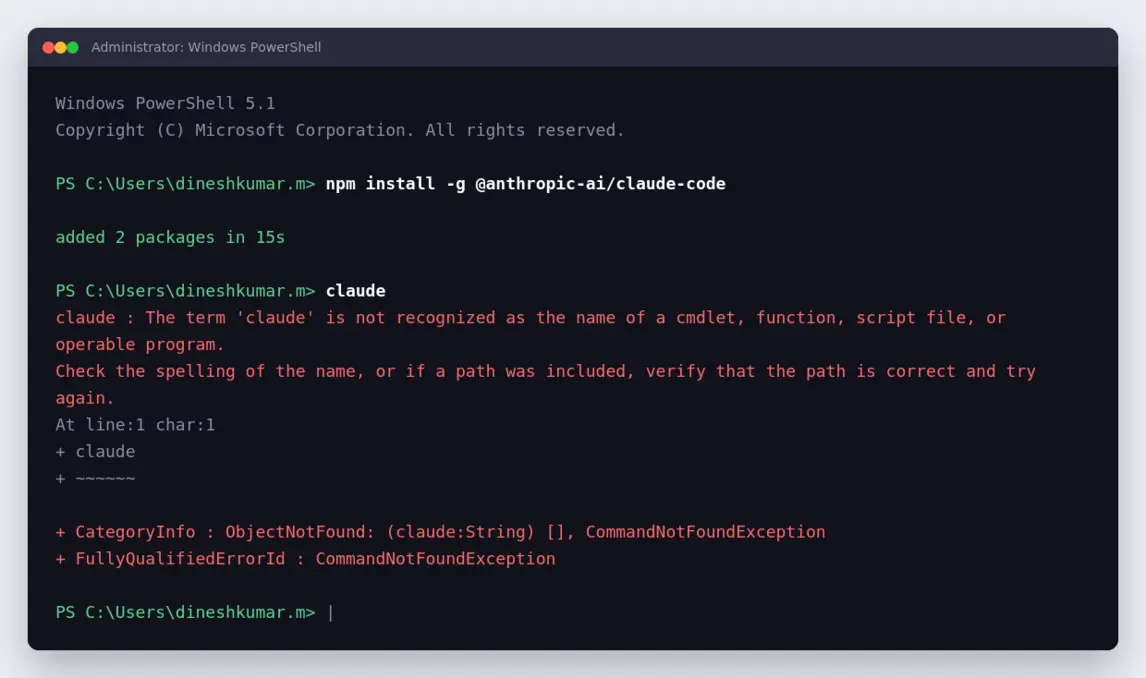
This is the important part: install and log into Claude Code using your regular system terminal (PowerShell, Command Prompt, or Terminal on Mac) — not inside IntelliJ. The IntelliJ plugin simply calls the claude command once it exists on your system; it doesn’t install it for you.
- Open a normal PowerShell/terminal window (outside of IntelliJ).
- Run the official npm install command:
npm install -g @anthropic-ai/claude-code - Wait for the install to finish.
The install completes successfully (“added 2 packages”), but running claude right after still throws CommandNotFoundException — that’s the next problem to solve.
If you try running claude immediately after installing and get the same “term not recognized” error, don’t panic — this almost always means a PATH issue, not a failed installation.
Step 4: Fix the “claude is not recognized” PATH Error
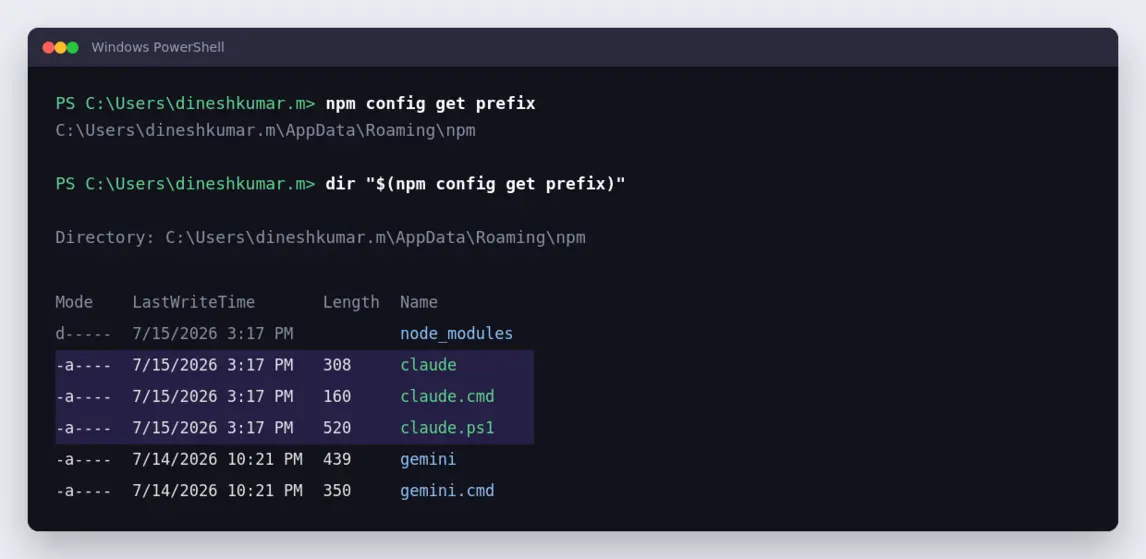
Here’s how to confirm and fix it.
4.1 Find Where npm Installed the CLI
Run:
npm config get prefix
This returns a folder path, typically something like:
C:\Users\<your-username>\AppData\Roaming\npm
4.2 Confirm the Files Are Actually There
Run:dir "$(npm config get prefix)"
You should see claude, claude.cmd, and claude.ps1 listed in that folder:
The files are present — claude, claude.cmd, and claude.ps1 — confirming the CLI installed correctly. The problem is simply that Windows doesn’t know to look in this folder.
4.3 Add the Folder to Your PATH (User Variable)
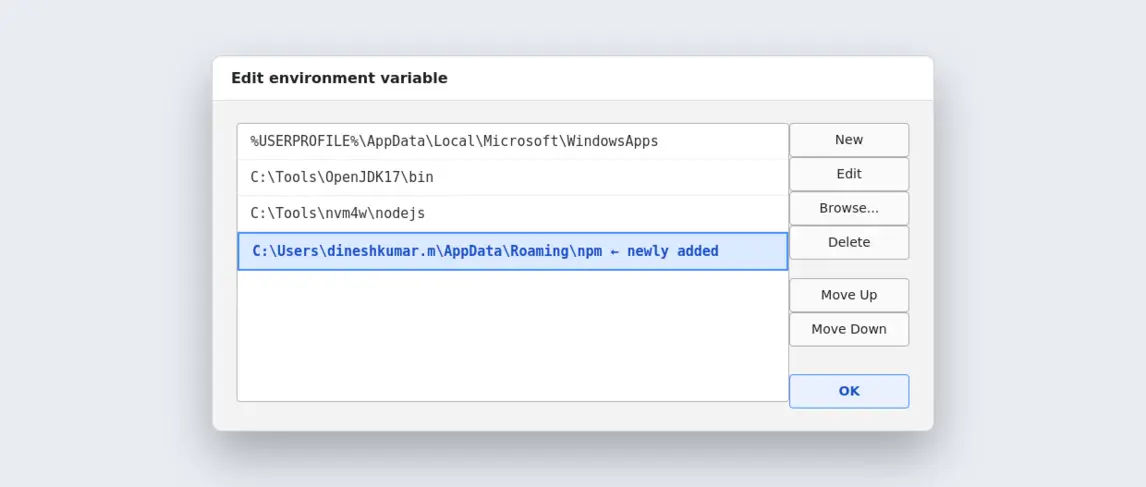
- Press the Windows key and search for “Environment Variables”.
- Open Edit the system environment variables.
- Click the Environment Variables button.
- Under User variables for [your username] (the top box), select the row named
Path, then click Edit. - In the list that opens, click New, then paste in your npm prefix folder, e.g.:
C:\Users\<your-username>\AppData\Roaming\npm - Click OK on every open dialog to save.
The npm folder added as a new line inside the existing Path variable — this is the fix that finally makes Windows recognize the claude command.
⚠️ Common mistake: Don’t create a brand new variable named after the folder path. You need to edit the existing
Pathvariable and add your npm folder as one more entry in that list.
4.4 Restart Your Terminal (Important!)
PATH changes only apply to newly opened terminal windows. Close every open PowerShell/terminal window completely, then open a fresh one and test:
claude
It should now launch and prompt you to log in.
Step 5: Restart IntelliJ Too
Even after fixing PATH in a plain terminal, IntelliJ’s built-in terminal may still show the old error if the IDE was already open when you made the change:
Same error, but this time inside IntelliJ’s terminal — because the IDE process was launched before the PATH update and hasn’t refreshed its environment yet.
Fix: Fully close IntelliJ (not just the terminal tab — the entire application), then reopen it. Open a new terminal tab inside IntelliJ and run claude again.
Step 6: Authenticate Claude Code
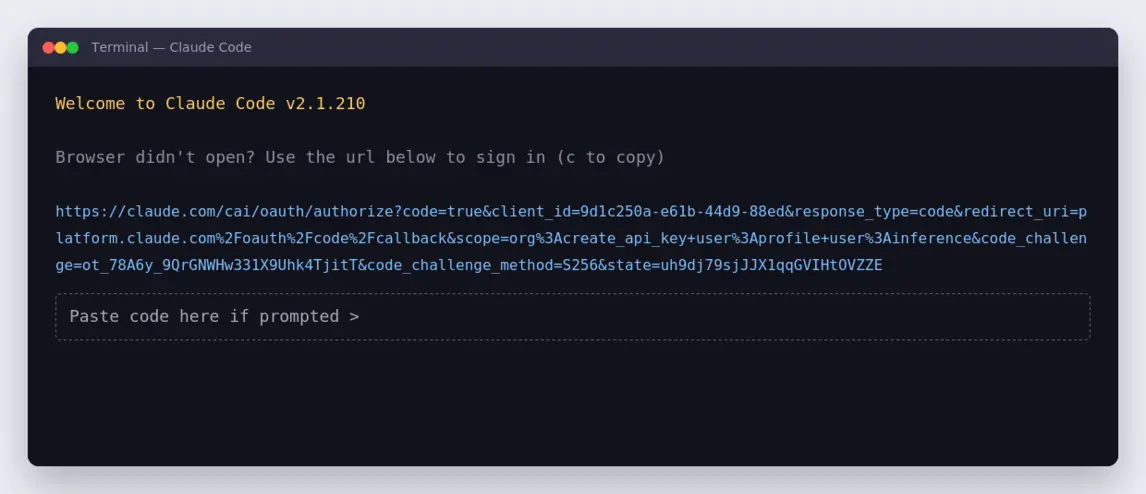
The first time you run claude (either in your system terminal or inside IntelliJ), it will try to open your browser automatically for login through Anthropic’s official authentication flow. If it doesn’t open, you’ll see a manual authorization link printed in the terminal:
Claude Code prints a full OAuth URL when the browser doesn’t auto-launch. Copy the entire link (it wraps across several lines) and paste it into any browser.
To complete login:
- Select and copy the entire URL shown in the terminal — from
https://claude.com/cai/oauth/authorize?...all the way to the end. It’s one long link, just wrapped visually across multiple lines. - Paste it into your browser’s address bar and press Enter.
- Log in with your Claude Pro account credentials if prompted.
- Click Authorize.
- Copy the short code shown on the confirmation page.
- Go back to your terminal, paste the code at the “Paste code here if prompted >” line, and press Enter.
That’s it — Claude Code is now authenticated and linked to your Pro subscription.
Step 7: Success — Claude Code Running Inside IntelliJ
Once authenticated, you can start a fresh Claude Code session directly inside IntelliJ’s terminal tab — this is the moment you’ve successfully managed to connect Claude Code in IntelliJ end to end. On first launch it may ask you to pick a color theme, and you’re ready to start prompting:
Claude Code running inside the IntelliJ terminal, showing a proposed code diff (red = removed, green = added) — this is how Claude presents changes before you accept them.
How to Actually Use Claude Code Once It’s Set Up
If you ever need to reinstall or check for updates, the plugin listing itself lives on the JetBrains Marketplace, and it’s worth bookmarking alongside this guide.
- Type requests in plain English at the prompt — e.g. “explain what this service class does” or “add a null check to this method.”
- Claude proposes changes as a diff (red for removed lines, green for added lines) that you can accept or reject before anything is applied to your files.
- Useful slash commands:
/theme— change the terminal color theme/ide— connect an external terminal session to your IDE/clear— reset the conversation context/help— view all available commands
Quick Recap
| Step | What You Do |
|---|---|
| 1 | Subscribe to Claude Pro |
| 2 | Install the Claude Code plugin from IntelliJ Marketplace |
| 3 | Install the CLI via npm install -g @anthropic-ai/claude-code in a normal terminal |
| 4 | Fix PATH if claude isn’t recognized (add npm’s global folder to your User Path variable) |
| 5 | Restart your terminal and IntelliJ completely |
| 6 | Authenticate via the OAuth link printed in the terminal |
| 7 | Start using Claude Code directly inside IntelliJ |
Final Thoughts
The trickiest part of learning how to connect Claude Code in IntelliJ isn’t the plugin itself — it’s making sure the claude CLI command is actually reachable by Windows through your PATH. Once that’s sorted, everything else (login, plugin detection, and running prompts inside IntelliJ) works smoothly.
If you found this walkthrough helpful, save it for the next time you set up a new machine — this PATH issue is extremely common and easy to fix once you know where to look, and now you’ve got the full process to connect Claude Code in IntelliJ documented in one place.